

Like many gearheads out there, I went through a “keyboard phase.” And though I did eventually settle in on a “daily driver,” I never really left that keyboard phase. I am only the writer that I am because the keyboards that you buy at the store simply will not suffice, are not specific and perverted enough to accommodate my aberrant typing. I have grown accustomed to my split keyboard, and my pursuit of perfection led me to DIY hardware, soldering, ordering PCBs, and most of my career writing about open source hardware.
A split keyboard is, appropriately, a keyboard split into two halves. Often these sides are tethered by a cord, although wireless alternatives do exist. This design is not new; in fact it goes back decades. It fundamentally comes down to ergonomics: Typing is unnatural, and having your arms angled inward with palms faced down to meet a single point doesn’t follow the resting shape of the human body. If the arms can be said to have a natural resting place, it is palms facing inwards or at least angled and shoulder width apart. Most keyboards are not shaped like this.
The effort to replicate a less stressful typing position has led to many absurd designs, including big U shaped keyboards that have you typing sideways. A good compromise is to split the board in half, and potentially to “tent” it by placing it on a slight angle pointing outward relative to the typing surface (many people settle on 20 to 30 degrees.). Some people go so far as to rig the keyboard under their desk or attached to their chair to better simulate this position. A split keyboard may sound like an unnatural arrangement, but as long as you’re not a hunt and peck typist, your hands behave the same way no matter where they are on your desk. All splitting the keyboard does is put them in a better place.
There are other advantages to a split keyboard, namely splitting the space bar. The space bar is usually not well designed. Your thumbs are very useful, and you do not need to dedicate two thumbs to the task of spacing. Splitting the space bar into two allows you to have two smaller keys to dedicate to different functions, like spacing and something else like return, shift or escape. By making the keys smaller, you also move less mass per stroke than if you were simply moving a single bar. Even if a split keyboard is impractical to you I firmly believe that most keyboards would benefit from the option of having two space keys instead of one. Even many non-split keyboards have a split space.
Now you may say to yourself, “great, I’m sold, where can I buy one?” The answer is “not at Best Buy or Micro Center.” The split keyboard has long been the domain of the tech pervert, and despite being the ergonomically superior option, the industry is still slow to offer the option at scale. Brands like Kenesis have been the entry level for a very long time, but their boards do not offer custom mapping or the ability to hot swap your keyboard switches.
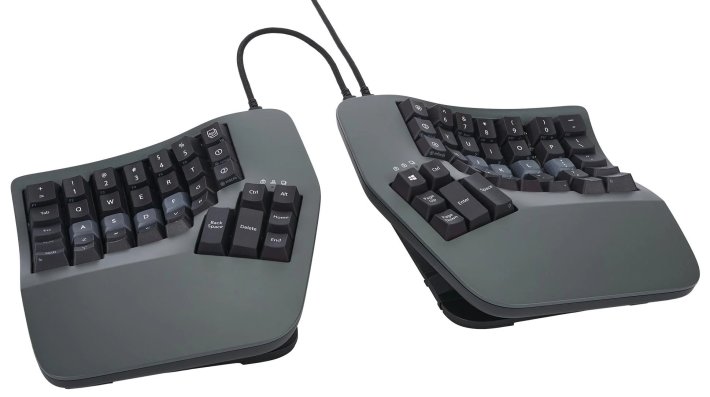
Keychron offers the Q11 at more than $200 dollars, which is well above their normal price point. There’s one called the Royal Cludge RKS70 which is hot swappable and has tenting legs but is not remappable. This may be a fun entry point for a lot of people looking to jump in without rocking the boat too much, but I have no interest in it. The company ZSA has several that are ideal, namely the Moonlander, The Voyager, and the Ergodox EZ. These feature a wonderful ergonomic “thumb cluster” and come ready to use. I know several people who love these, but they are also about $350 as of this writing.
Nobody has really nailed a split keyboard at the entry level, which is what pushes many people, myself included, to go custom. The DIY keyboard scene exploded years ago, and although it seems to have calmed down a bit (you only need so many keyboards before it’s “enough”), the work that the community has done has laid the foundation for increasingly elaborate input devices of increasing perversion and complexity. If there is a keyboard that you can dream of, someone has probably already made it and put the files and firmware on the internet for free.
A huge part of this work is firmware. That may sound trivial, but making sure that input devices work correctly and also allowing for custom mapping is a gargantuan task. There are several open source keyboard firmware options. QMK and ZMK are probably the most well known, the former being the established player and the latter being newer and more flexible for people trying to make their own custom keyboards. Many keyboards like those from companies like Drop and Keychron come pre-flashed with QMK, and often with a software called Via, although there is a competing option called Vial that many people prefer. The ZMK alternative is ZMK Studio. These allow not only for remapping your keyboard, but also for complex keystrokes, macros, and layering.
Why remap your keyboard? A world without QWERTY
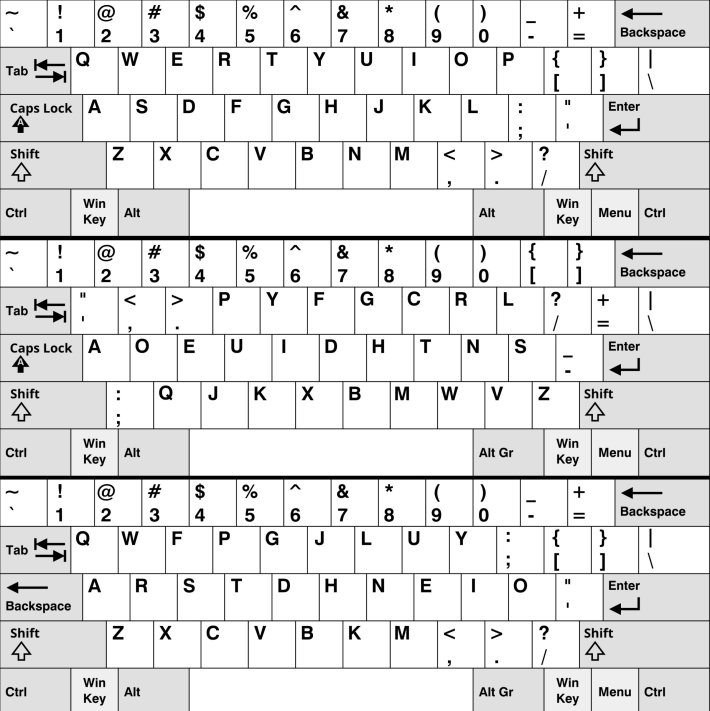
“What’s wrong with my keyboard layout?” you may ask. Nothing, technically, although the standard QWERTY layout is an abomination that has really only persisted because of momentum since its invention in the 1800s despite better layouts existing. The most well-known keyboard layout for a long time was Dvorak, which has been around since the 1930s. QWERTY sucks because it’s not ergonomic and there’s no modern rhyme or reason to where the keys are placed; rarely used keys often take up the prime real estate. Ideally a keyboard should place the most frequently used letters on the “home row,” the center row where the fingers naturally rest. Placing frequently used letters in hard to reach places subtly increases the strain of each keystroke, which contributes to overall wear on the user’s joints. An ergonomic layout does an analysis of letter frequency and attempts to keep those close to home.
Colemak was the true breakthrough of alternative keyboard layouts when it came out in 2006, being both superior to Dvorak and easier to learn for users coming from QWERTY. Since then, many alternative layouts have sprung up, as have subsequent analysis. These various layouts take into account letter frequency as well as different factors like bigrams and trigrams. Despite evolutions in layouts analysis, Colemak is probably the most well known alternative, and the more evolved Colemak Mod-DH is tried and true and simple to suggest to people. You don’t even need a custom board to do it; there are multiple ways to play around with keyboard layouts on an OS level. There’s plenty of free tools online to help you learn those layouts too. I don’t have a dog in this fight as I have attempted to leave QWERTY so many times with different layouts but have never fully committed. That said, I know that switching to a new layout like the updated version of Colemak is an inevitability for me.
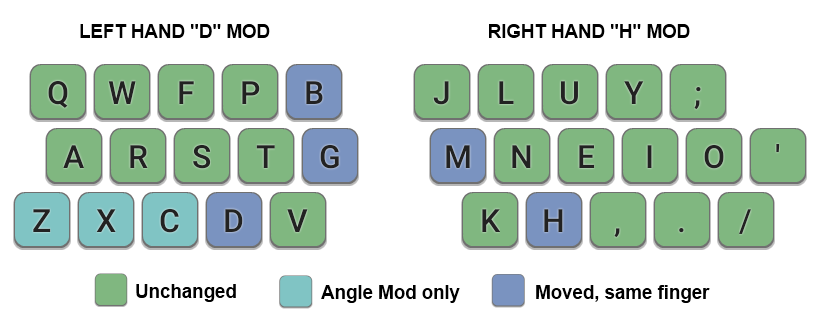
Even if you decide to stay a QWERTY coward, there are other advantages to remapping your keyboard. Here’s a simple one: taking back the precious real estate stolen by the slovenly caps lock button. Caps lock is the most useless button on the keyboard, made redundant by the humble shift key, and it’s sitting pretty on some of the best real estate on your keyboard, easily accessed by the pinky. Most sane layouts come to this conclusion naturally, and for years the Happy Hacking Keyboard was preferred by coders for this very reason. Most OSes will let you switch that input without even changing your keyboard, and in Windows you can do it on PowerToys. It’s one of the first things I did on my MacOS laptop, along with turning the right command and right option to backspace and delete. On top of this there’s also Karabiner Elements for MacOS, and katana for cross platform.
Another important tool at your disposal that custom keyboard firmware allows for is “layering.” Instead of dedicating space on your keyboard to keys that are out of the way, layering allows you to place different keyboard keys and macros on different layers, often accessed by holding a key of your choice down. Often this is a dedicated layer button on the keyboard, but you can also just make it so that your space bar(s) function as raise and lower layer functions when held down. While this sounds complicated in theory, in practice it is very natural with a tiny bit of practice.
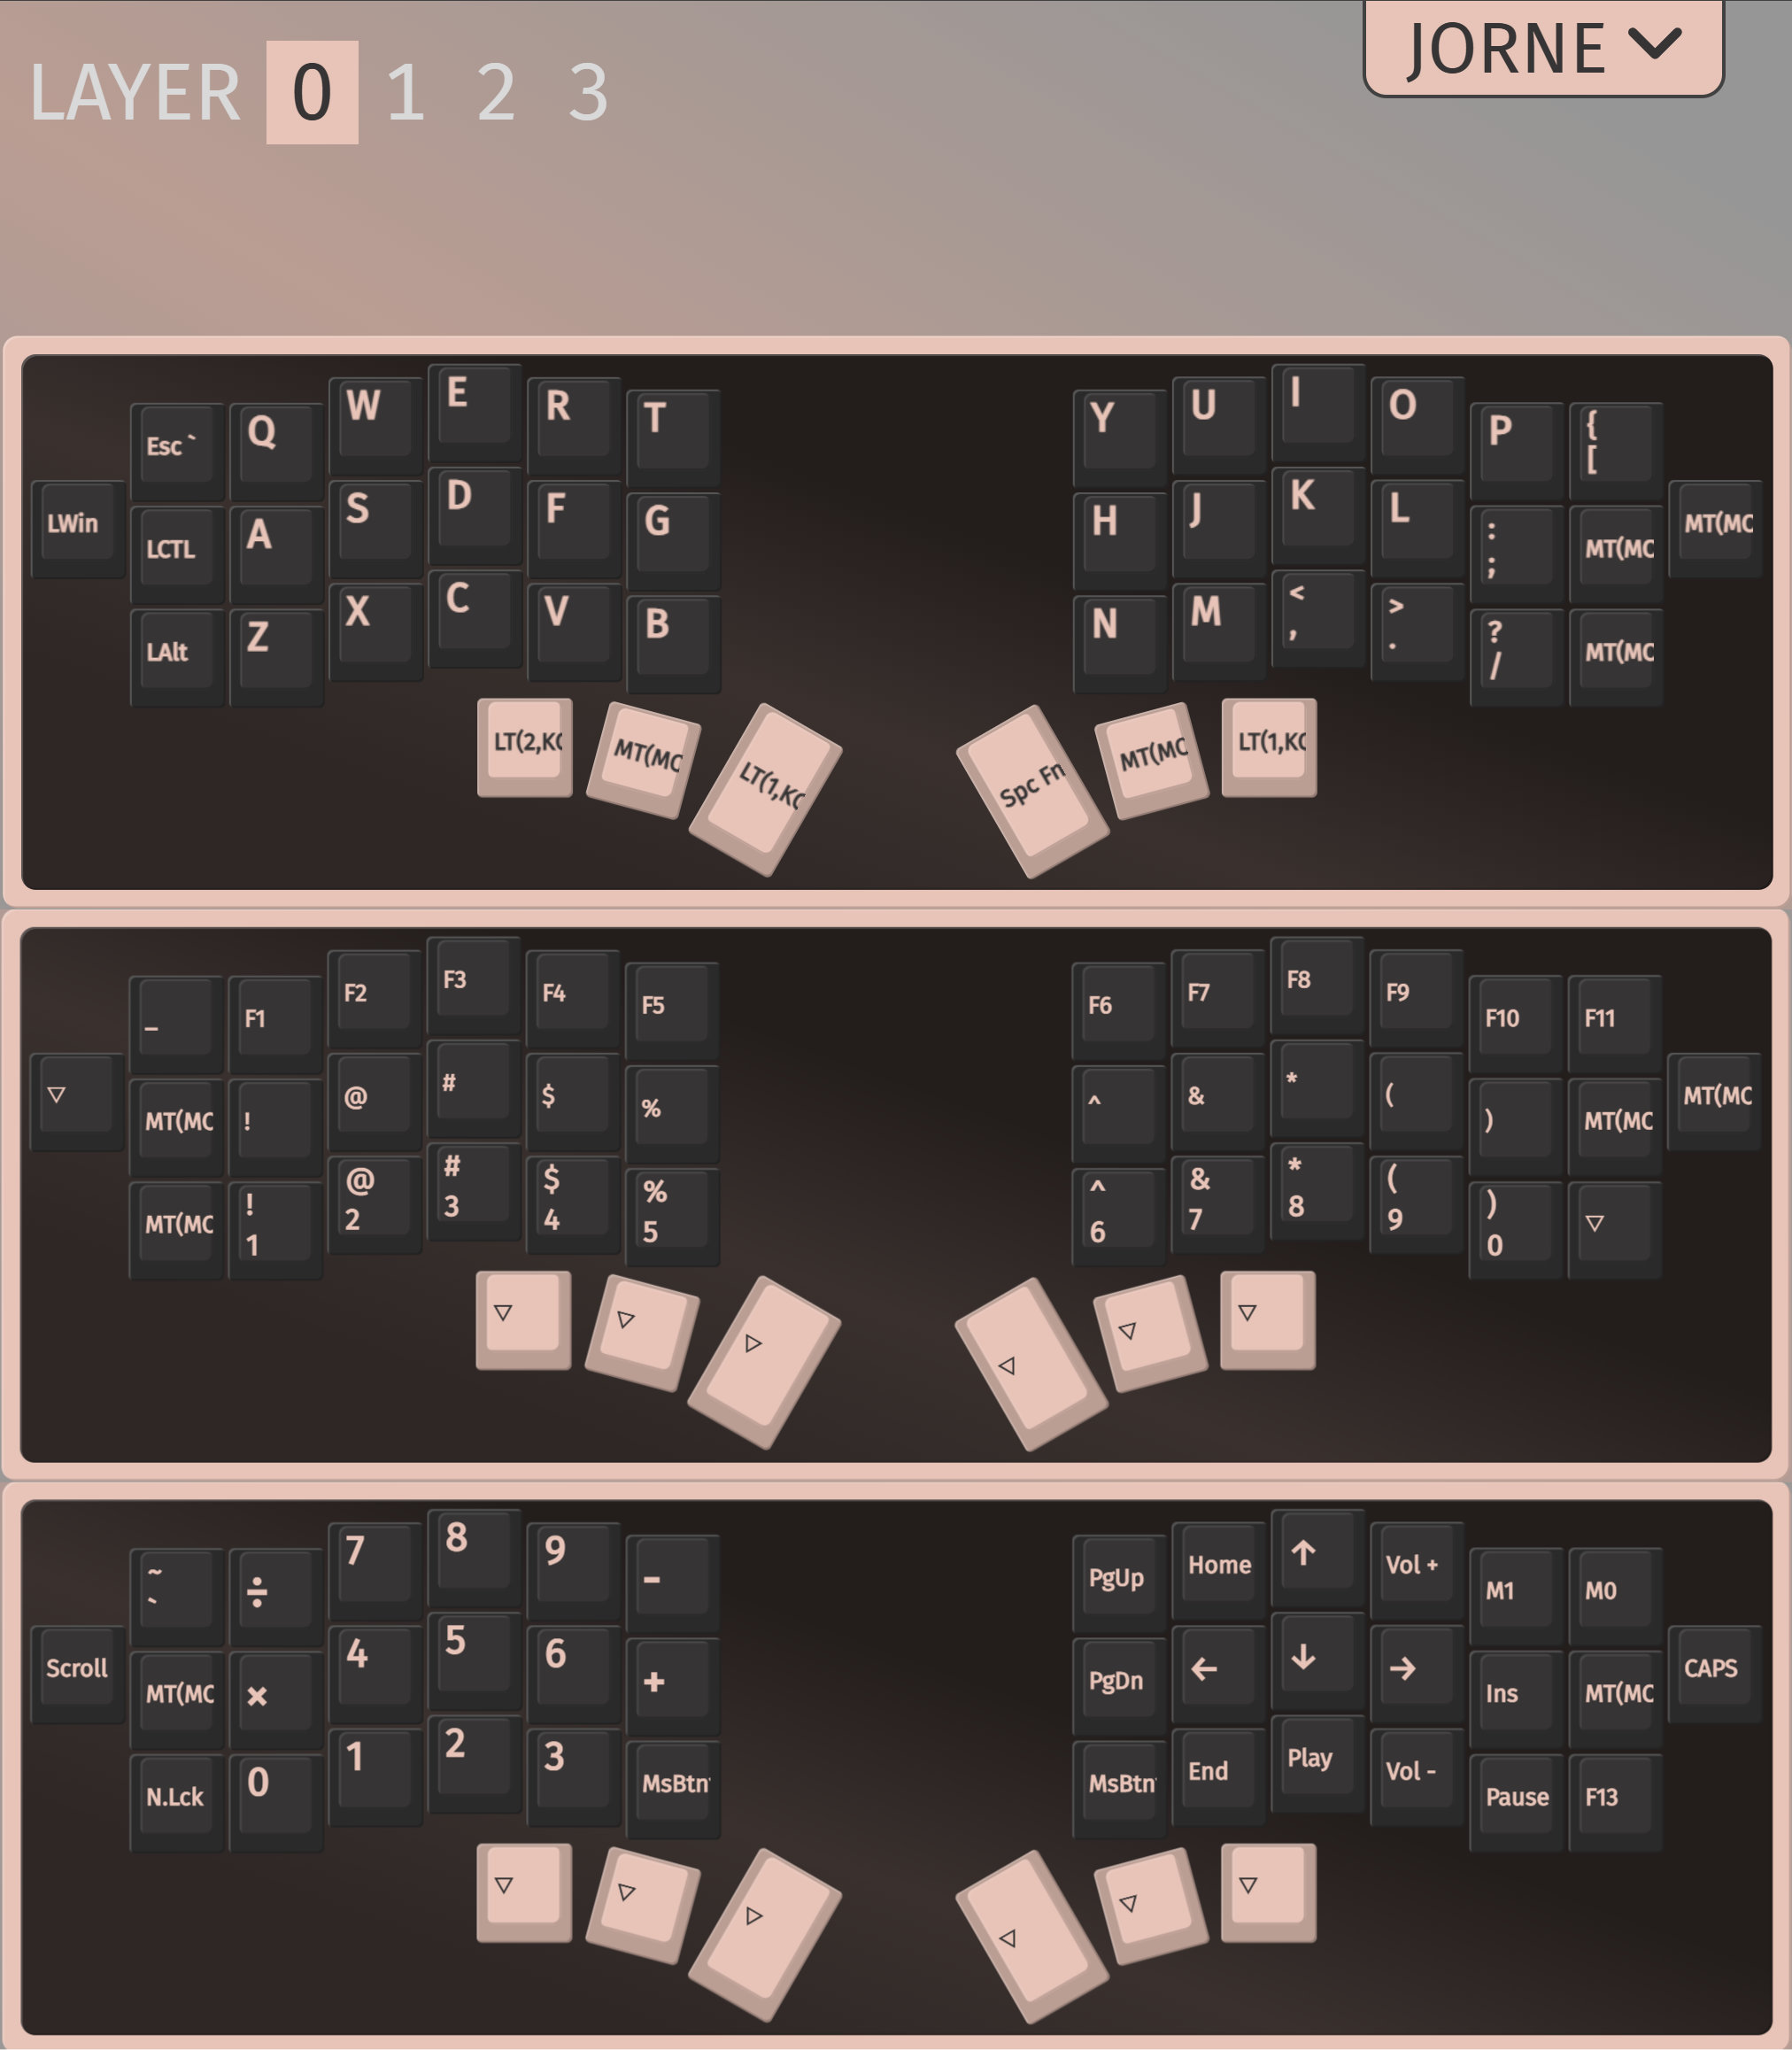
The two most obvious use cases for layering are numbers and the arrow keys. Arrows are crucial to page navigation, but placing them to the right forces you to move your hand every time you wish to navigate. By placing them on an adjacent layer where the JKLI keys usually are, navigation becomes as simple as holding down your space bar. This should be intuitive to anybody who frequently edits video and uses JKL to scrub back and forth, as well as any gamer who has ever navigated a game world with WASD. I cannot stress how much faster this small change makes basic page navigation.
Numbers and symbols, which normally require reaching up and holding shift, can be placed on not just one row but several. In my case I have numbers on the bottom row of my keyboard on one layer, symbols on the middle row, and function keys on the top row. In addition to this, I also have a numpad on a separate layer, which should excite any numpad sickos who have worked data entry and know how much faster numpads are. Layering could be an article unto itself, and has allowed me to shave the size of my keyboard down more and more as the years have gone by. If you wanna see how deep this rabbit hole actually goes, look into “chording” (pressing multiple keys together to represent a single input or syllable), which is how stenography keyboards have traditionally worked, allowing for typing up to 370 words per minute. This behavior is now more accessible than ever thanks to selflessly-made open source hardware and firmware.
Going custom and DIY
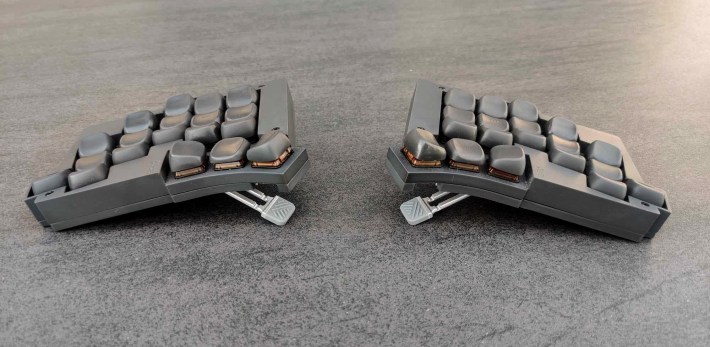
We live in a better world for typing than we did years ago, in part because companies have embraced open source, mappable keyboards as a viable commercial option. But when I started down this long path, DIY was the only game in town I could afford. My first custom keyboard was the Sofle, which featured not only a thumb cluster but also rotary encoders for scrolling. The Sofle was a variation on the Lily58, which itself owes a lot to the most popular open source keyboard in history: the Corne.
The Corne is a 40% (no numbers or function keys) split keyboard, and no discussion of this topic would be complete without giving that board and its designer Kosuke Adachi, aka Foostan, their flowers. Originally based off of the ortholinear Helix, the Corne features a “staggered” layout, meaning that the keys more aggressively follow the differing lengths of the finger. It’s open source and easy to build, and if you know how to order circuit boards from China there is no shortage of tutorials on how to do this. Because of its open nature, it has allowed countless modifications and variations to be built. God bless the Corne; many of us would not be here today without it.
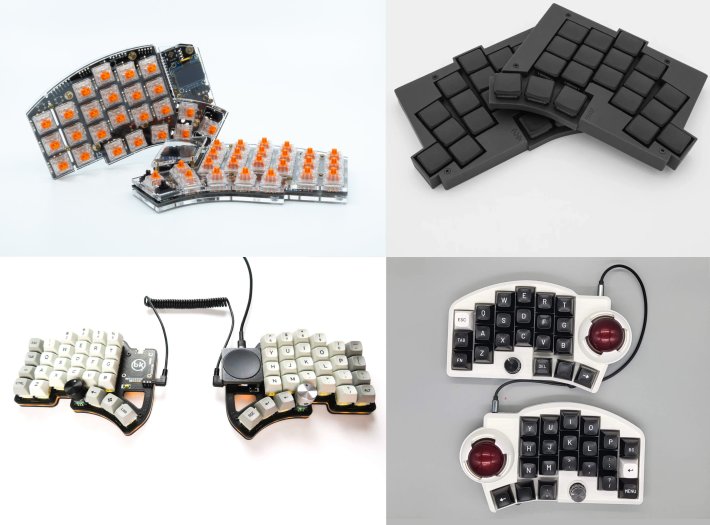
When I bought my Sofle I had not yet taught myself how to solder, so I relied on the work of a custom keyboard builder I found on reddit to do the job at a fairly reasonable price. These days, the options are varied depending on what you want and what your price is. There are more split keyboards than you can summarize. You have vendors SplitKB, who have sold the beautiful Kyria. Keebsupply is a vendor for the GEIST TOTEM, which is a lovely low-profile staggered board with just enough keys. BastardKB sells several “dactyl” based keyboards – custom u shaped boards meant to fit your hand more aggressively –as well as the Dilemma, a design which features a trackpad. Fingerpunch is a good vendor with a very inviting Discord. You can also go the Etsy route – tons of keyboard vendors are on there. No matter what you buy, just make sure you know if you’re getting a kit that requires soldering or a whole keyboard, because the latter is always going to be more expensive.
But since many of these boards are open source and the designs are on Github, you can do what I have done multiple times: download the files and have a PCB manufacturer like JLCPCB, PCBWay or OSH Park print the PCBS out and mail them to you. The raw parts and PCBs to make a keyboard are dirt cheap. This is unquestionably the most labor intensive way to do this, and you will have to be proficient in soldering and learn how to flash firmware onto your keyboard. But once you’ve built one split keyboard the process is kind of similar for all of them, and the GitHub repositories of most of these boards also include extensive tutorials.
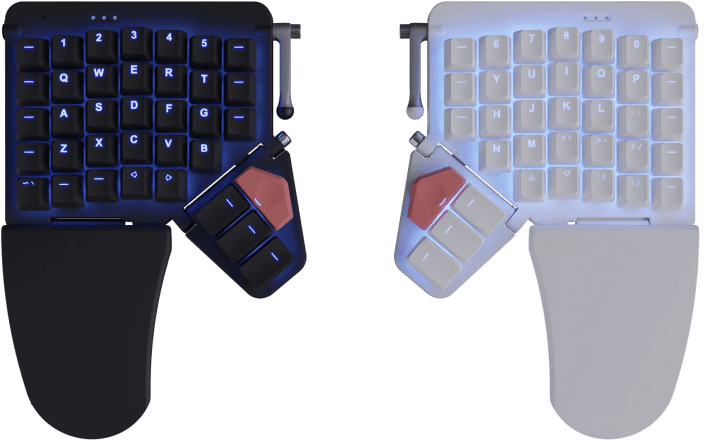
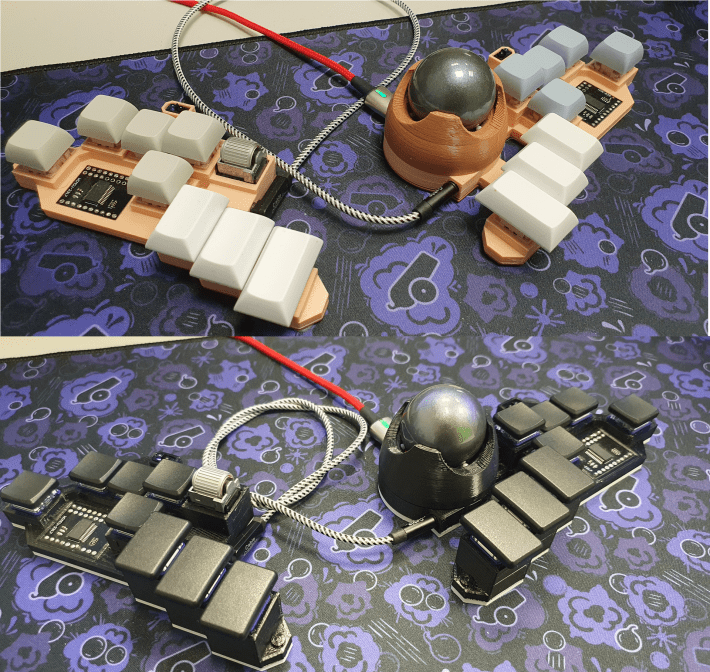
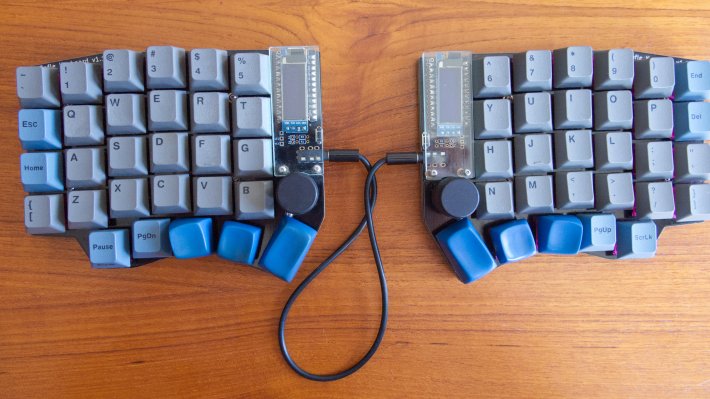
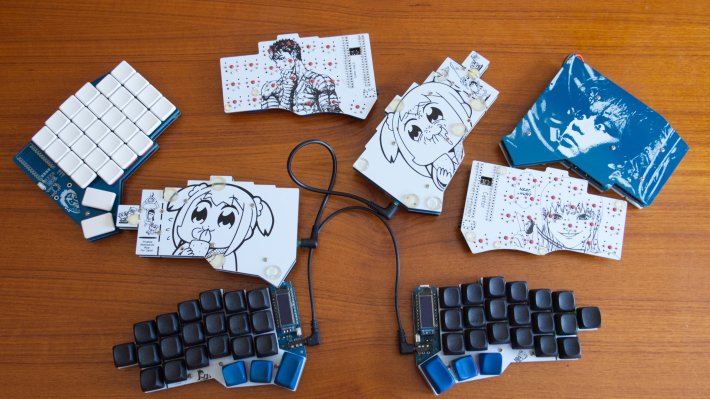
Getting your own boards made also lets you import art into the open source circuit software KiCAD and doodle on your PCBs, which I have done many times. My current board is called a Nijuni: a modification of a Jorne, itself a spiritual successor to the Corne. I had those printed out, vandalized them to have Pop Team Epic art on it, and have never looked back. I have even experimented with wireless options, which is now far easier than you would expect as you can get microcontrollers with bluetooth on aliexpress for like five bucks these days, which is great even if you decide not to go that route and buy extra in the event of potential duds.
Switches
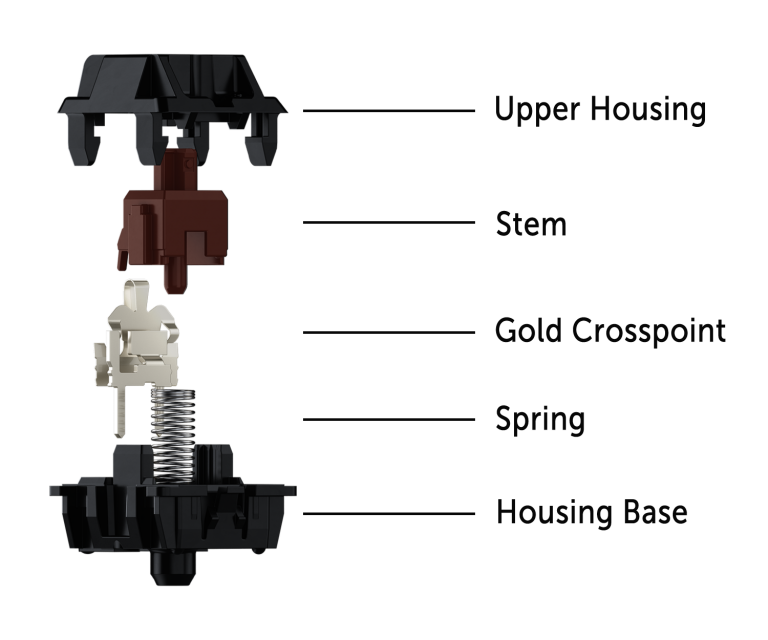
If you are making a keyboard from scratch or modifying an existing one, you can spend a lot of time on your keycaps and your switches. People obsess over this to an almost unhealthy degree, but I will try to simplify and summarize the key points here quickly. Most mechanical keyboards (i.e., the good kind that don’t use those cheap rubber dome switches) that are not low profile use Cherry MX style key switches, a weird little cube that turns the stroke from the keycap into an input. These are generally sorted into linear, tactile and clicky switches. Linear just go down with no tactile resistance, tactile have a little bump in them, and clicky switches are loud, satisfying, and will make any coworker, roommate or spouse in audible range want to cave your skull in with an axe handle.
I generally prefer tactile switches in the style of Cherry MX Browns, although most keyboard snobs now will tell you the original Cherry Brown switches kinda suck. My sweet spot is about 45 to 55 grams of force depending on the switch. There are more switches like this than there are stars in the sky, and the ones in my keyboard were made by a company that went out of business five months ago. A lot of people seem to like the Holy Panda switches, and nothing sounds quite like the Gazzew Boba U4T, which I have used and which RTings loves. Keyswitches can also be modified, and all of mine have been “spring swapped” using 55 gram switches from Gazzew. This is done by taking each individual key switch and disassembling it using a key switch opener (these are very cheap) and putting a new spring in. While you are in there, applying a small bit of aftermarket lubrication is a great way to make the switch feel fantastic. I use 205G0 on mine.
Caps
Keycaps are a deep rabbit hole unto itself, and everyone feels differently about them. There are multiple kinds of plastic you can use, but ABS and PBT are the most common. For years I used a Leopold keyboard, and those use thick, beautiful chalky PBT caps with a specific profile that l had grown accustomed to. When I got my Sofle I went so far as to buy some secondhand Leopold caps that a guy on reddit didn’t need any more. Even outside of keycaps specifically, r/mechmarket remains a great place to buy and sell old keyboards and parts that people don’t use any more. There are many different keyboard “profiles,” different shapes that conform to fit the curve of your fingertips. You can’t go wrong with the standard Cherry profile, although it’s been a minute since I have bought keycaps so I don’t know what the meta is anymore.
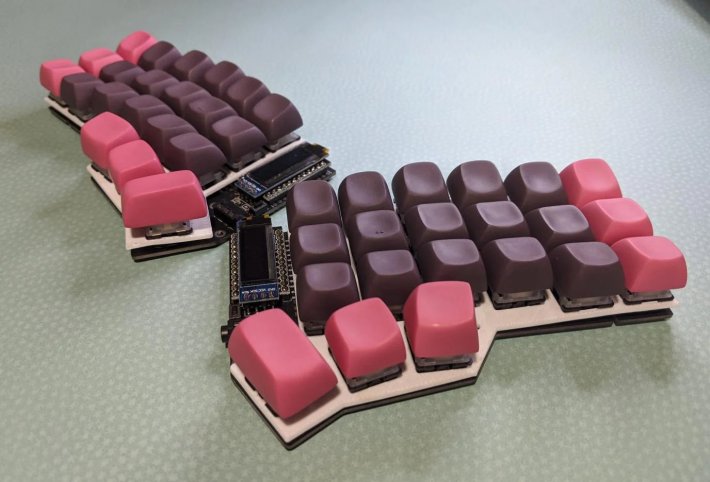
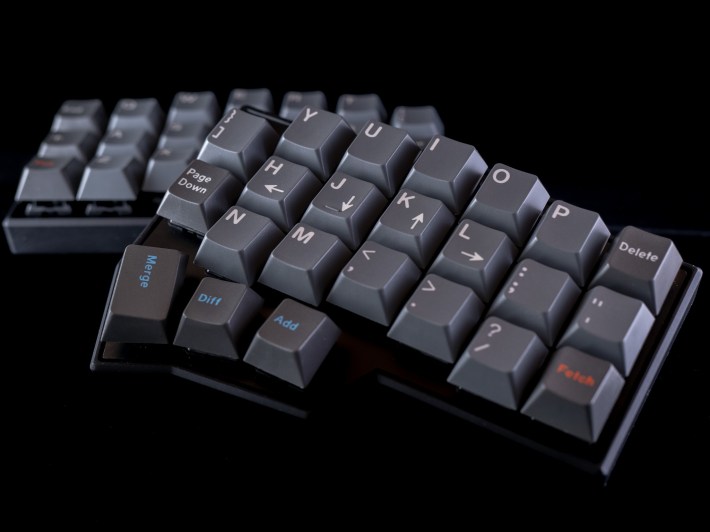
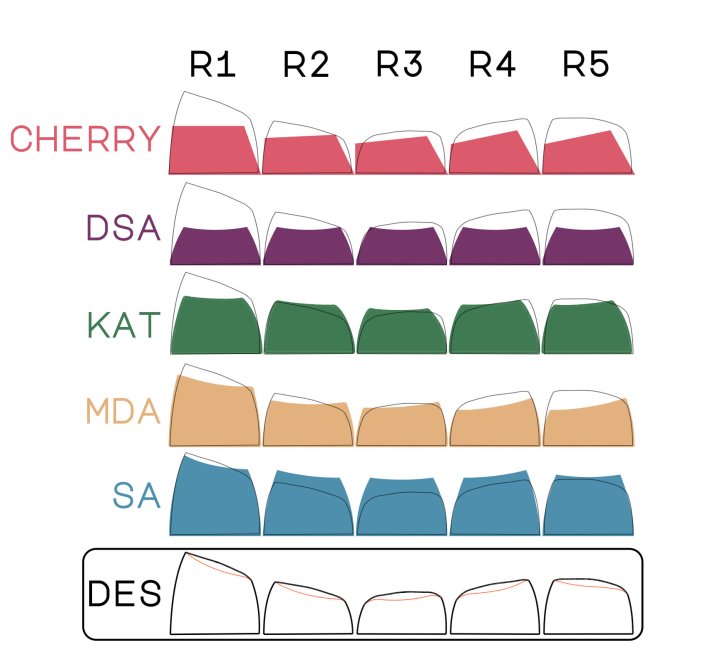
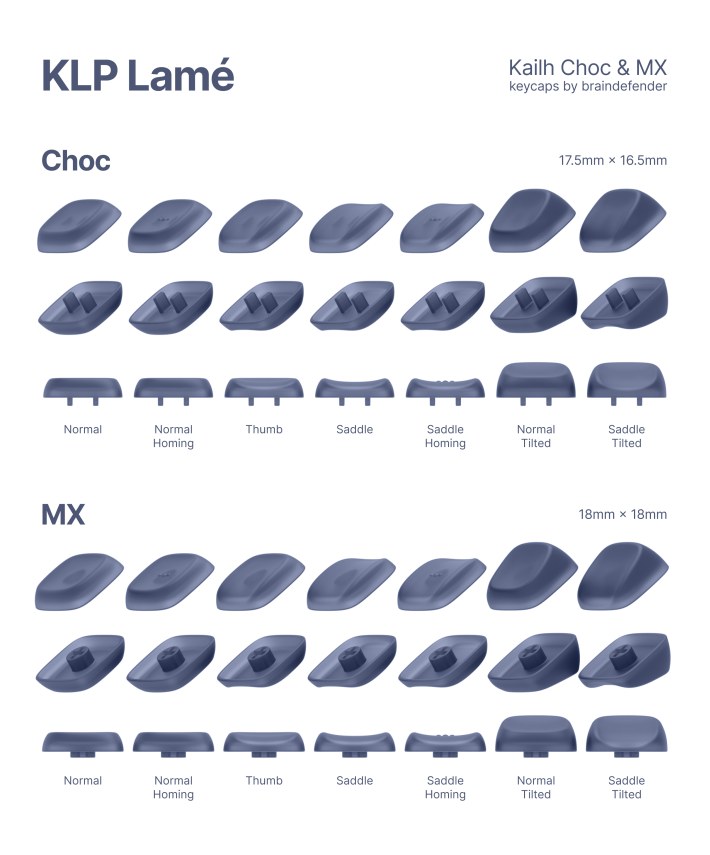
The keycap profile I settled on a few years ago is called DES, short for “Distorted Ellipsoidal Saddle,” a beautifully designed ergonomic keycap by designer Pseudoku. Pseudoku makes gorgeous “artisan” caps and sells these in resin, and I have several for the thumb cluster of my keyboard. Pseudoku actually open sourced much of the design, and so for the main three rows I actually had the keycaps printed in PA12 Nylon, a kind of nylon that you need a very expensive kind of 3D printer to make but which is fairly inexpensive to do in small quantities. Someone sells those on Etsy if memory serves, but if you need a lot of keycaps there’s nothing stopping you from doing it yourself. Pseudoku’s are made out of porcelain and resin and feel tremendously nice. They kind of feel like you’re typing on teeth in a good way. An alternative if you want this pervert lifestyle is the fairly new KLP Lame, a recent addition to the open source keycap world that has both choc (low profile) and MX (regular) variants.
From custom keyboards to Aftermath
I love my split keyboards and wish that more budget options existed. You should be able to walk into a Micro Center and just buy a pre-assembled Corne, or something like it, for 100 bucks or less. I must also acknowledge that the lack of options from big companies made me hungry, restless, and a more interesting writer. The first real soldering projects I had were about keyboards. It’s the thing that taught me exactly how to order PCBs from China, and led me to realize that many of the parts in my electronics can just be ordered directly from aliexpress.
Because no keyboard fully satisfied me for so long, I was forced to make my own, and in the process the nature of the keyboard became demystified. It is the wellspring from which all of my DIY electronic interests have emerged, because so many other things follow once you modify or assemble a keyboard: mice, VCRs, LED lighting, custom hitboxes, speaker modifications. The mechanical keyboard boom has subsided, but what remains is a more interesting world of DIY tech and increasingly elaborate split keyboards. If that sounds interesting to you, think about trying or maybe even building one, because it could potentially lead you to places you never imagined.


